Software Environment
Since this is a systems programming class that uses networks, we're going to need to setup some pretty complicated software to do the cool things we need to do on the assignments. Students will follow three steps to get setup:
- Setup the VSCode IDE with all of the features we need for the course
- Setup development tools for C on either Windows or Mac OS
- Setup VirtualBox to host a tool we'll use to create a software defined network on our own computer!
Step 1: Visual Studio Code
In this class, we will be using Microsoft Visual Studio Code(VSCode) to write code. VSCode has nice plugins for syntax highlighting, code completion, and built in documentation for C and C++. Visit this link to download VSCode for your appropriate operating system. Most Windows and Linux users will want the 64-bit download. Please post on Discord if you are having any issues installing VSCode.
Even if you already have VSCode installed, continue on to the instructions below to make sure you have the plugins configured properly for this class.
Setting Up SSH with VSCode
Motivation: Students will be using a tool called mininet in some of the later assignments, which is used to simulate various network connections. Unfortunately, it's a bit difficult to install natively on Mac or Windows, but I've created some virtual images that you can run using VirtualBox. Luckily, VSCode has a very nice add-on that makes it easy to connect and code on these virtual images. You can read more information about it at this link, but I will summarize the important information below
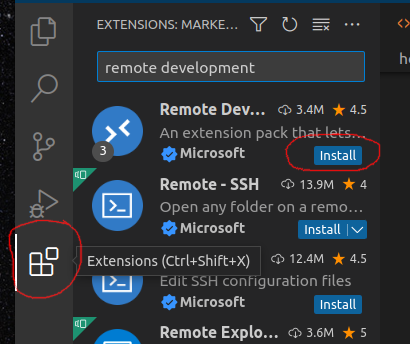
1: Install Remote Development Extension Pack
First, search for and install Microsoft's Remote Development Extension Pack in the extensions store:
We'll return to this in the virtualbox section
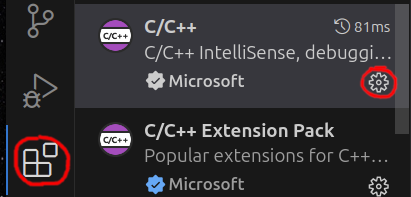
2: Install And Configure Microsoft Intellisense C/C++ Extensions
First, install the plugin, then, click on the settings icon next to it and scroll down to "Settings"
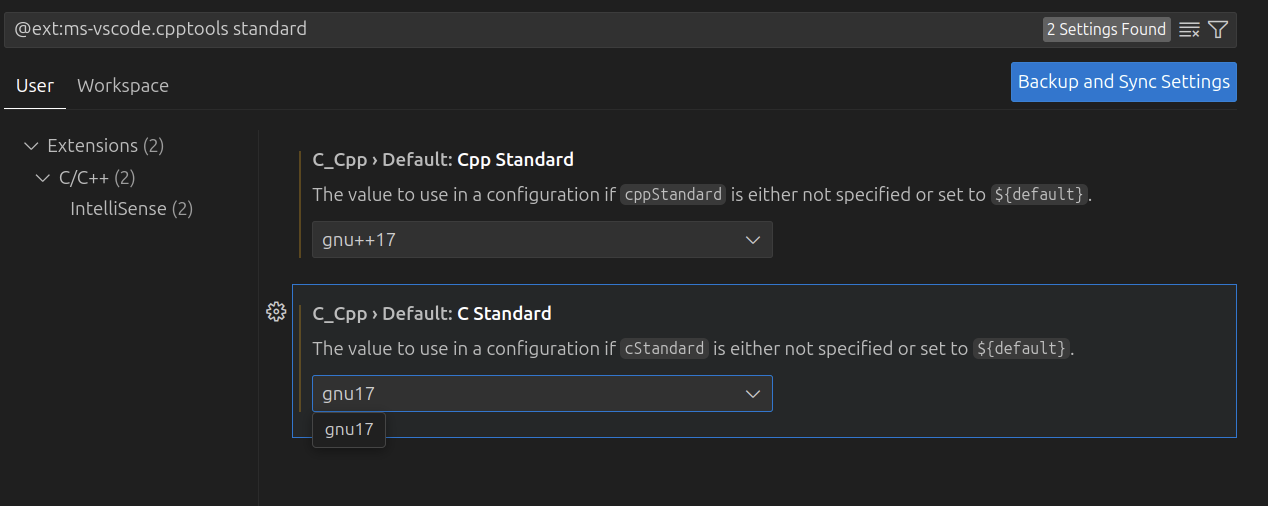
And switch the standard to gnu++17 and gnu17
3. VSCode Command Line
One nice thing about VSCode is that you can launch a terminal in the IDE below where you're coding. There are myriad ways to launch the terminal, and it even has its own dedicated menu in VSCode. Once you've logged in using the directions above, you can launch a terminal at the bottom of your code environment, and you should see something like this:
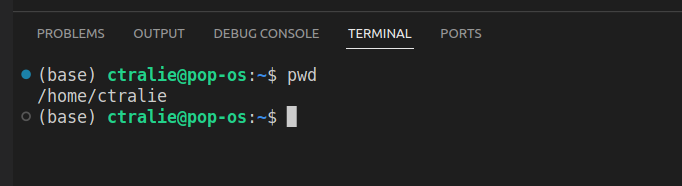
Note that you can open up multiple terminals, which will be useful in this class.
Other Features
Below are a few features I want to highlight that will come in handy as your working.
Unused variable highlighting
If you don't use a variable, it will show up in darker text. This is very useful when debugging. It means that either you didn't actually need the variable, you forgot to use it (hence you didn't complete your code), or you spelled it wrong somewhere. This saved many a student last year! (NOTE: The examples below are in Javascript, but the same applies to C/C++/assembly)
Replace within Selection
If you want to change the name of a variable in one section of your code, you can do a CTRL+F, which will bring up the find/replace menu, then follow these steps:

Method Documentation
There's a nice feature where if you start typing /** and hit ENTER, it will autocomplete method documentation for you
Step 2a: Windows Software Environment Instructions
Below are instructions to setup a linux-like development environment on Windows
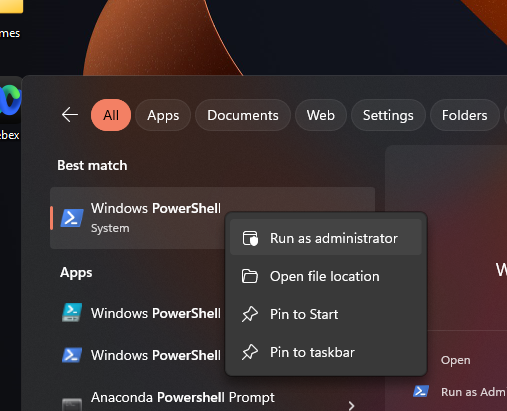
Step 1: Install The Windows Subsystem for Linux
-
Open PowerShell as Administrator (Start menu > PowerShell > right-click > Run as Administrator)
and enter this command:
Then press
ENTER -
Once the above has finished, restart your machine. When it reboots, it should launch a terminal where you can configure your username and password:

Step 2: Configure Your Development Environment
Now that the Windows Subsystem for Linux (WSL) has finished installing, we'll test it out and setup the software needed for this class
-
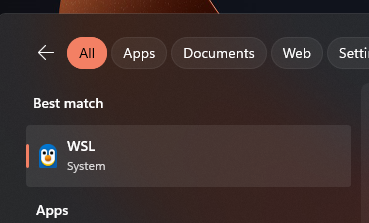
Launch WSL from the start menu
-
Back in the terminal, type
and hit
ENTER -
Next type and hit
ENTER. This may take a moment. When you see the following: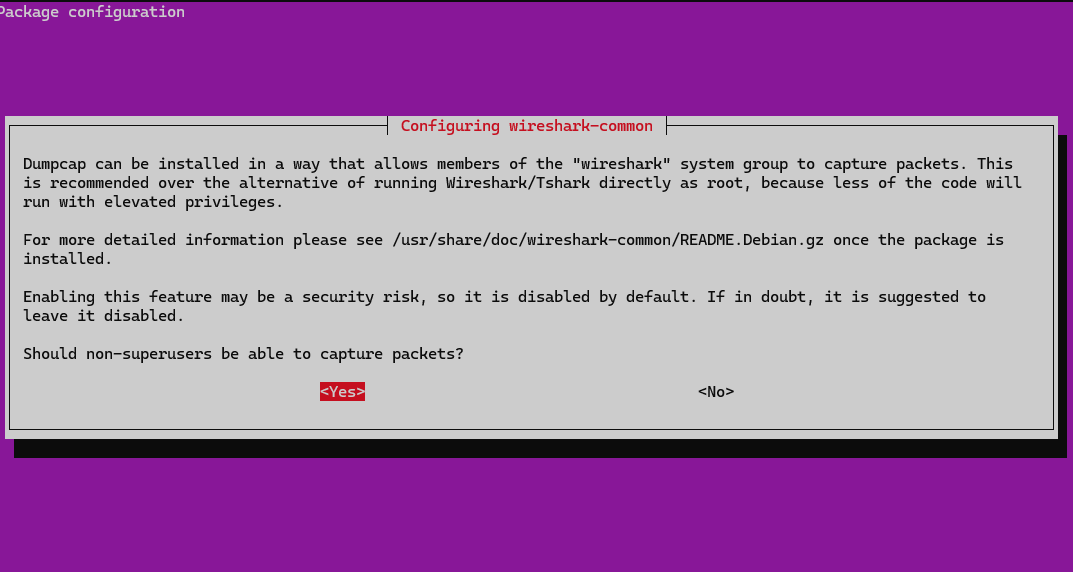
Be sure to select
Yes
Now you should have everything you need to compile C/C++ programs on your computer, as well as run a whole slew of network tools!
A Note on File Paths under WSL
It's possible to go through the entire class in just the terminal, but you may want to navigate through and organize your files and folders using the ordinary Windows explorer. Everything under your regular windows filesystem is linked to from a special place in WSL. For instance, if my username is ctralie and I have a folder named CS174 on my Desktop, then I would change into the CS174 directory by typing
Note also that if you have VSCode installed, you can open files anywhere under your WSL file tree in VSCode by typing
where filename is the name of the file you want to open
A Note on Copy/Pasting under WSL
Since CTRL+C means something special (kill a running process), copy actually happens with CTRL+SHIFT+C. Likewise, paste happens with CTRL+SHIFT+V.
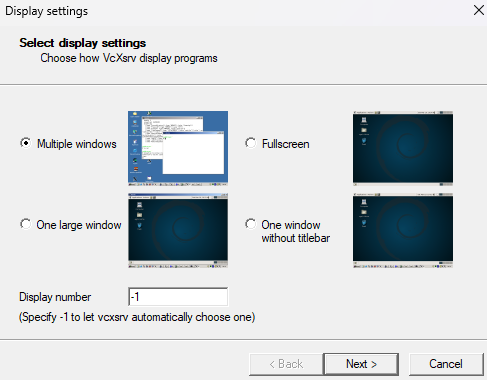
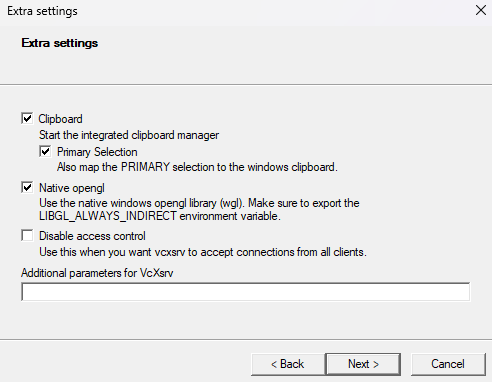
Step 3: Setup VcXsrv Windows X11 Server
We need to setup an X11 XWindows client on Windows to receive messages from wireshark running in a virtual host for the more advanced assignments later in the course. First, click here to download VcXsrv. Then, launch the program XLaunch with the default options:
Step 4: Setup PuTTY
You'll need to download a special ssh terminal to use wireshark in the virtual image under Windows for more advanced assignments later in the course. Click here to download PuTTY. Then, configure PuTTY to connect to your localhost, which we'll use to run wireshark on the virtual image. First, select 127.0.0.1 as the host with port 3022:
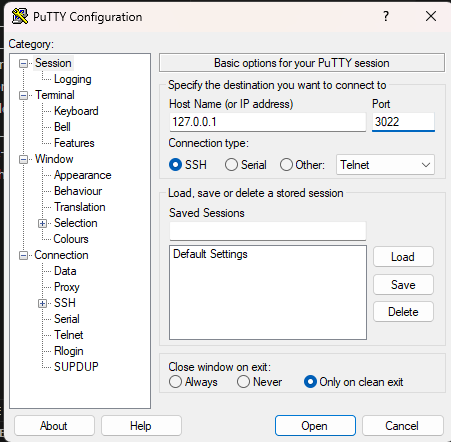
Then, select Enable X11 forwarding after expanding the SSH node in the options tree:

When you're finished this, you should go back and save your configuration so you don't have to re-enter this information each time. You'll test to make sure this works after you setup the virtual image
Congratulations, you are now finished! You may proceed to the virtualbox setup
Step 2b: Mac OS Software Environment Instructions
Mac OS comes with considerably more support by default for Linux-like apps than Windows does, but there's still some work we'll have to do to get it ready for this class. Below are the steps:
- Open up the terminal, and type
and hit
ENTER. If it saysno input files found, then that atually means g++ is working! g++ is a program that compiles c++ files, so it needs a file as input. The fact that it tells you that means that it's running properly. If, on the other hand, you getCommand 'g++' not foundor you get something about an "inactive developer path," then follow these directions before proceeding. Be patient...they may take a moment. You should see something like this happening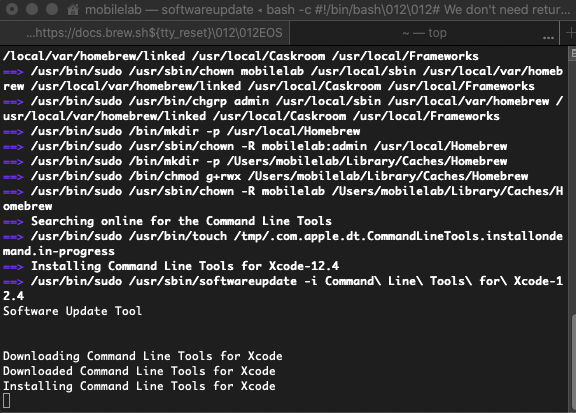
-
If you do not already have brew, follow the directions to install it at https://brew.sh. You should see something like this during the process:
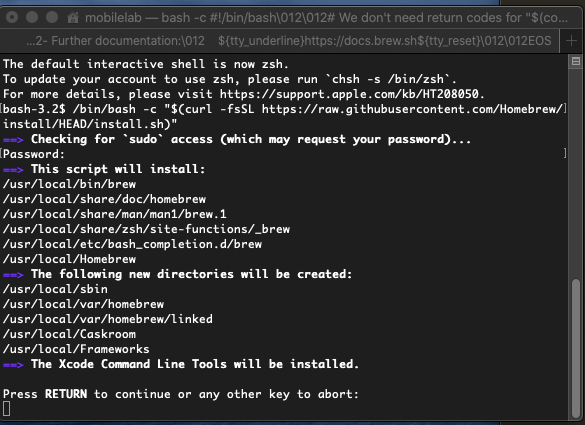
Be sure to follow the next steps to add brew to your path
-
Execute the following command in the terminal
This will make sure you have the permissions for brew to update package information
-
git is a "version control system" we will use to manage code in the class. Try typing the following command in the terminal to see if you have git already
If this command is not found, then install git with brew:
and try again
-
Execute the following command in the terminal
This is a special script that will help us compile complicated projects across different operating systems.
-
Execute the following command in the terminal
This is a Unix command line utility that reads/writes data across network connections using the TCP or UDP protocol
-
Execute the following command in the terminal
This is a command line utility used to do things like port scanning and host discovery
-
Execute the following command in the terminal
This is a program that we will use extensively in the course to analyze network traffic coming into and out of our computers
Also note that when you see the following during the installation:
Be sure to select
Yes -
Execute the following command in the terminal
This is a program that will allow us to use wireshark inside of a virtual machine running mininet on our computer
Congratulations, you are now finished! You may proceed to virtualbox setup
Updating C/C++ Compiler
NOTE: Most students should skip this step
-
Only if you're unable to run the sanitizer in homework 0, you'll need to update your C++ compiler framework to be more recent. Type
After that's finished, note the type of terminal you're running. If you're running zsh, then type
Otherwise, if you're using bash, type
Then, close and restart your terminal, and type
If you seeHomebrew clang version [...], then you're good to go. If you still seeApple clang versionor something similar, then the above steps failed, and you should message me or post on Discord.
3. VirtualBox Setup
Later in the course when we implement parts of the transport layer (TCP) and the network layer (routing), we're going to use a program called mininet to create software defined networks with arbitrary topologies on our own machines! Because setting this up natively in Windows or Mac OS is quite complicated, I'm instead going to have students code on virtual linux images that I setup in the background. This is the only time students will need to use the remote login tools; otherwise, they can code directly on their own filesystems.
To get started, download and install VirtualBox at this link, being sure to choose the right platform; for instance, those using M1/M2 macs should choose macOS/Apple Silicon hosts. Restart your computer after the installation.
Then, assuming you're on the Ursinus network, visit http://nimbus.ursinus.edu/mininet/ and download and extract the .zip file appropriate for your system; those using M1/M2 macs should download the arm zip file, and those using Windows or intel macs should download the x86 zip file. You'll need about 10GB free on your machine to use these!
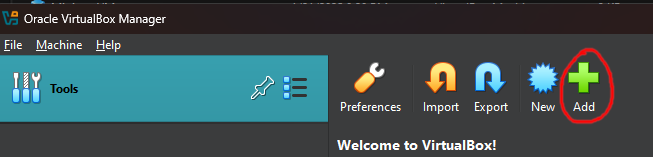
Once you've downloaded and extracted the file, open VirtualBox and add a new image, navigating to the folder where you extracted the virtual machine:
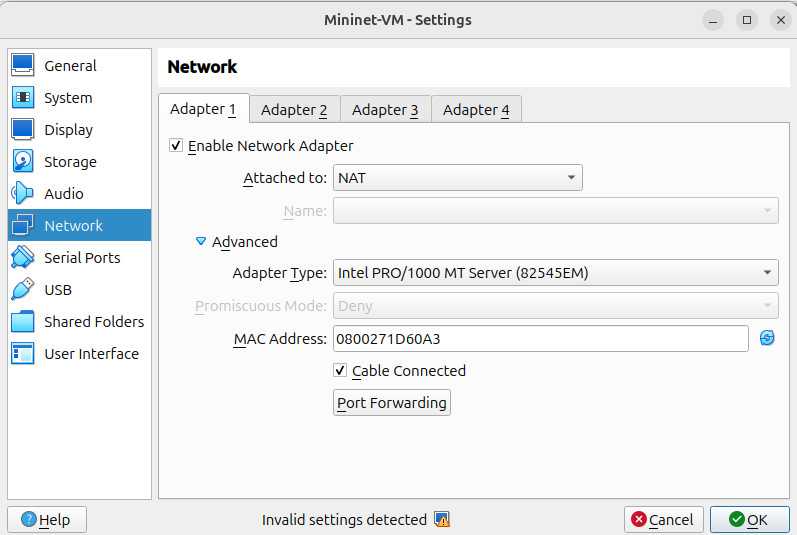
Now, go to the Network properties of the virtual machine, and make sure the network adapter is attached to NAT:
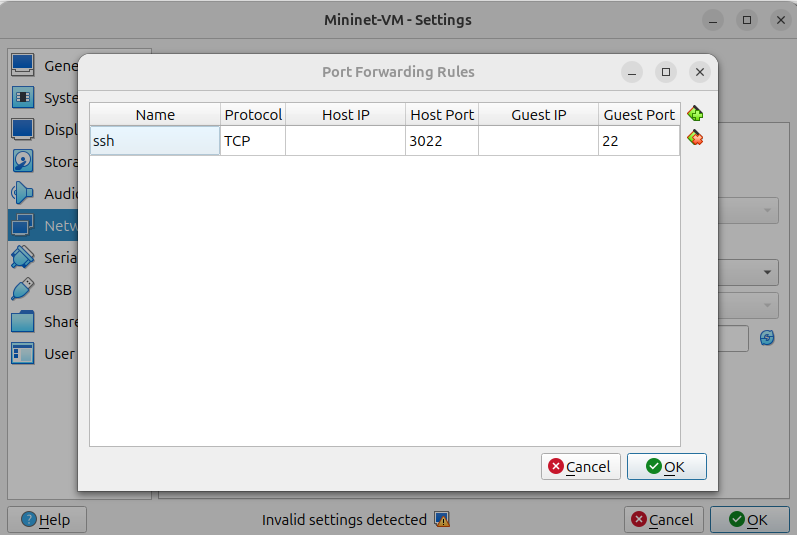
Then, click on Port Forwarding, and setup an entry as follows (NOTE: This may already be setup, but double check it):
Finally, launch the VM and enter mininet for both the username and password. Once it has booted up, we're going to log into it from VSCode's remote development extension. Type CTRL+SHIFT+P, and enter the following into
ssh -p 3022 -X mininet@127.0.0.1

Save this information to your .ssh configuration for future use:

Now, you can enter the username and password, which are both mininet. You can now code on this virtual image using the VSCode IDE!
NOTE: If you want to make this more secure, you can change your password with the passwd command. This might be good, since technically someone could ssh into that virtual machine while you were running it if they knew the port we were using (which would be as dangerous to you as someone breaking into a computer on your network). Related to this, if you want to log in without having to present your password each time, follow the instructions at this link.
Running Wireshark on The Virtual Image
Now, if you're on Mac, you can launch wireshark by typing
sudo echo
and then
sudo HOME=~ wireshark &
(Note that the first command was just to make sure you'd entered your password for sudo mode before you launched a background process)
If you're on Windows, you'll instead need to launch XLaunch and login using PuTTY and run those commands from the PuTTY shell. But you can still run other non-GUI terminals through VSCode (I was just having trouble getting X11 forwarding working on windows in anything except PuTTY!)