Homework 7: Build Your Own Router (BYOR)
Chris Tralie
Learning Objectives
- Manage communication at the boundary of the link layer and network layer, and understand how a router and switch can work together across that layer
- Handle raw packets, manipulating the link layer, network layer, and up at the byte level
- Handle ARP messages and manage ARP caches
- Forward packets at the network layer
Description / Overview
We have reached the finale of the course! You will now create the software to control a router from scratch. We'll be using a framework called mininet to simulate a network of switches connected to each other and hosts connected to them, and we'll be using a software defined network controller called pox to program the switches. Since a switch can only send data between devices at the link layer that are directly connected to it, you'll be upgrading the switches so that they into a proper router, which is capable directing traffic at the IP layer to hop through many switches on its way to a final destination.
Getting Started
We'll be using mininet and wireshark together in this assignment, so you might want to go back to homework 0 and review how you got them to run together before.
You can obtain the starter code for this assignment by using git:
You will be editing the file pox/pox/cs475/router.py
Note that if you're on a virtual machine in VirtualBox, that's where you should clone this repository and run the code. You can also ssh into that virtual machine with VSCode and code there.
Generally, you will have three terminals running at a time, which you should start in this order:
- One running mininet:
This creates the virtual switches and hosts according to the specification in
routers.json. This is a lot cheaper than buying physical programmable switches for everyone in the class 🤣Don't worry about the remote controller; we'll launch that in a moment with pox
-
One running a pox network controller. This is what we will use to program the switches to turn them into routers. If you say the following from within the HW7 directory:
Then you should get an output like this:
Note that you will sometimes see some errors with DNS packets; that's okay, we can ignore those in this assignment.
Debugging: Note that you can kill this with CTRL+C and relaunch this as many times as you want without having to restart mininet
-
A terminal running wireshark. If you're on a virtual machine, be mindful that you may have to run X11 forwarding to see wireshark running on that machine (review the directions here).
As an example, if you're running the above two terminals with mininet and pox on the starter code, you run wireshark on
s1-eth1, and then you typein the mininet terminal, you should see the following in wireshark:
Eventually you should also see ARP response messages and ICMP messages back and forth, but right now the switch send any traffic out so the ARP request gets dropped.
What To Submit
You should submit the file router.py in pox/pox/cs475
Programming Tasks
You'll be writing most of your code in the RouterSwitch class in pox/pox/cs475/router.py. Each switch in your network will be a different object of this class type, and you'll be implementing functionality to promote these switches to routers.
Each RouterSwitch comes with instance variable for its mac address, its IP address, and its subnet mask. It also starts out with a routing table with entries to its neighboring switches.
Packet Bytes
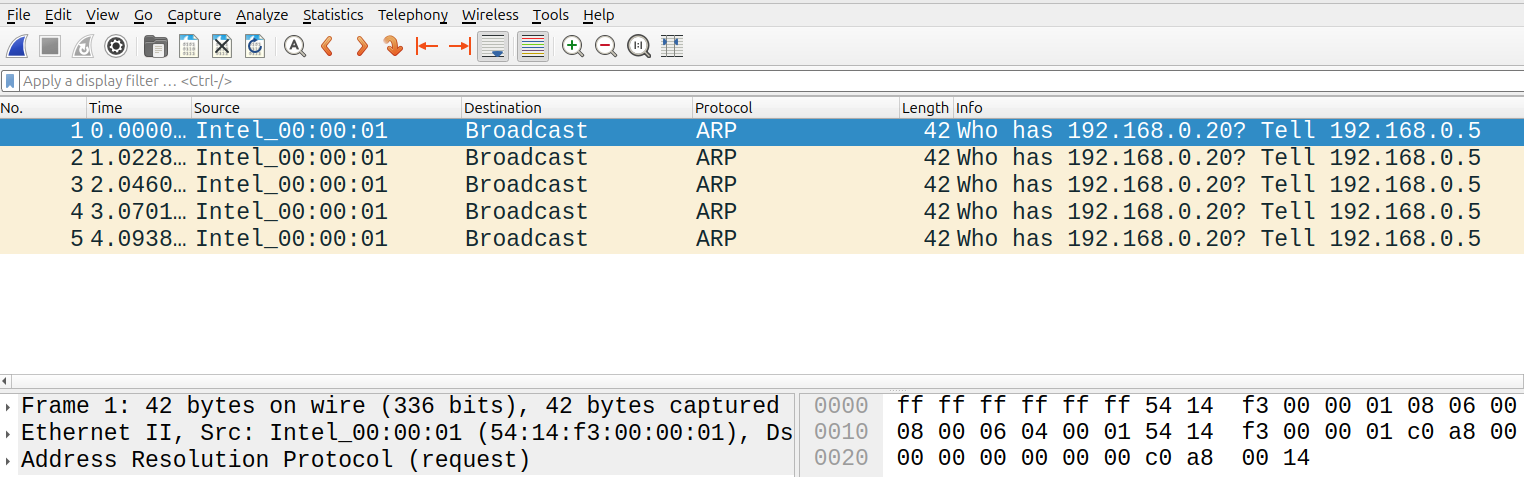
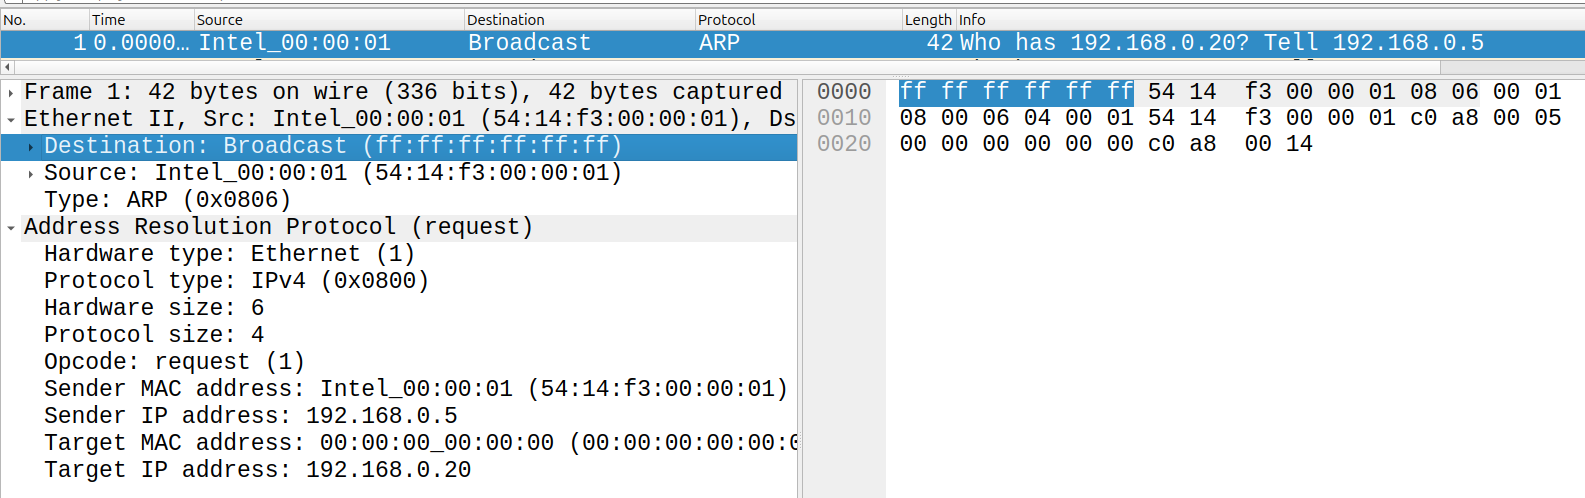
When a packet is received, the callback instance method _handle_PacketIn is fired. The variable src_port in that method stores the switch port where that packet entered the device, and the variable packet contains byte array of a raw packet from the link layer up. For instance, for an ARP broadcast (mac destination ff:ff:ff:ff:ff:ff) packet from a mac address 54:14:f3:00:00:01 at IP address 192.168.0.5 asking for IP address 192.168.0.20 would have the following bytes in packet:
Below shows wireshark parsing this:
Eventually, you'll construct your own byte arrays as packets to send out to other devices
Simplifying Assumptions
As explained in the tasks below, you will slowly promote a switch to a router, which includes tasks like handling ARP packets and ICMP messages. We'll make the following simplifying assumptions to get a minimum viable product without an undue headache:
- The devices plugged into a switch don't change, so we have a constant mapping from switch ports to mac addresses
- Every host has a static IP address, so no DHCP is involved
- The routers have static IP addresses. Given this and the above two assumptions, this means we don't need to purge our ARP cache periodically like we would in real world applications.
- All of the ports on the router share the same network interface controller, so that there is just one mac address / ip address per router
- Our router will only be capable of processing IPv4 packets
Default Network
The default network, as defined in routers.json, looks like this (note that the switch port connections are arbitrary and do not necessarily reflect what mininet has setup):

Task 1: Learning Switch (8 Points)
We're going to start off by implementing some functionality in the link layer. The RouterSwitch class in router.py actually encapsulates a simpler device than a router: a switch (Click here to review the differences between a switch and a router). In our context, a switch is simply responsible for sending out network traffic to a particular "port" (think like the ports you plug ethernet cables into, not a UDP/TCP port). The picture below depicts this:

In mininet, switches can be connected to hosts and other switches, as shown in the default network above. Each of these devices has a mac address, but this switch doesn't initially know what mac address is connected to which port (and in fact, this can change when we plug new things in). So you'll need to learn this mapping yourself
Your Task
Learn a mapping from mac addresses to switch ports by observing traffic that comes into your switch; that is, every time a packet comes into your switch, create a dictionary entry in mac2port based on src_port and the source mac address of an incoming packet. Then, use this information to send traffic out of the correct port on the switch based on the destination mac address. To send the bytes in a packet called packet out to a particular port dst_port using a pox network controller in one of your instance methods, write the following code:
If you don't know what the destination port is, simply "flood" the network segment with this packet; that is, send it out of all ports on the switch. To do this, use a destination port of of.OFPP_FLOOD. Also, when you construct the message in this case, be sure to pass along the source port:
This prevents the packet from being sent back into the same port, which would lead to an infinite loop.
The block diagram below shows this algorithm:

Testing
If this is working, you should be able to ping between any two hosts that are directly connected to the same router; for instance, h2 from h1. In the mininet console, type:
Tips
-
Be sure to use the mutex lock
mac2port_lockwhen reading from/writing tomac2portto prevent race conditions (click here to review how this works) -
You may want to make a helper method like
def send_packet(self, packet, dst_mac, src_port)to encapsulate this task. It will help you with later tasks.
Task 2: Managing An ARP Caches (9 Points)
Now we're going to start building the glue between the link layer and the network layer by parsing ARP replies and sending out ARP replies to requests addressed to our router.
Your Task
There are two things you need to do in this task:
- When you receive an ARP reply, update your ARP table with a mapping from the provided mac address to the IP indicated by the packet. Do this regardless of who the packet is addressed to at the link layer, but be sure to send this packet out to whoever on the switch it was intended for if it wasn't directed to our router's mac address directly.
- If you receive an ARP request addressed to your router's IP address, respond with an ARP reply that has the mac address of the router.
Tips
You'll have to do this by looking at the raw bytes of the packet for replies coming in, and you'll have to construct your own bytes for the ARP packet for replies going out. Have a look at the packet structure at the wikipedia page on ARP.
Testing
The best way to test this would be to have hosts connected on the same router ping each other, and then make sure that the ARP table in the router gets updated with their IP->mac mappings. You can also ping one of the routers from an attached host (e.g. h1 ping 192.168.0.1). You won't see a reply from the router yet, but if look in wireshark at that host (e.g. s1-eth1), you should be able to see the ARP reply from your router.
Task 3: ICMP Reply (8 Points)
Now we're going to make it so that a host can ping the router it's attached to.
Your Task
If you receive an ICMP ping request, send an ICMP ping reply with the same payload and a ttl of 32. To do this, you'll have to construct the bytes for an appropriate ICMP payload (similarly to homework 6). Then, you'll have the information you need to construct the bytes in the network layer (Click here to review the IPv4 layer). You can assume that
Testing
You should now finally be able to ping your router from a host connected to it! For example, you can say:
or
Task 4: One-Hop Routing (15 Points)
Now we're finally going to do some work to send packets from hosts to hosts beyond their immediate network segment!
Your Task
If you receive a regular IP layer packet that's not an ARP packet, check to see if it's addressed to a host in our router's subnet. If so, send it directly off to that host as usual. If not, forward the packet based on the longest common prefix of the destination IP address and a destination router in the routing table at self.route_table, following the prescribed next hop.
Packet modifications
If you have to forward the packet, before you forward it, make the following changes:
-
Decrement the
ttlby one and update the checksum. If you don't do this, the packet will be dropped at the next hop. Also, you should drop the packet yourself if the ttl has gotten to 0. - Update the source mac address to be the mac address of our router.
ARP Requests
Note that if you don't know the mac address of the next hop router for a packet, you'll have to send out an arp request for that router's IP address and queue this packet. When you get an arp response with this mac address, immediately send all of the packets that were queued up. Be sure to lock self.route_table, self.arp, and self.arp_queue as appropriate
Testing:
By default, the routing tables only start with the direct neighboring router connections. But this already unlocks hosts that are one hop away. So, for instance, you should be able to finally ping h3 from h1:
Or h5 from h4
Task 5: Dropping Packets / ICMP Error Messages (8 Points)
Do some validation at your router by examining the IP checksum, and drop packets with an incorrect checksum. Send back an ICMP error message for that, and also send back an ICMP error message when the TTL gets to 0 (more details coming soon...)
Testing
traceroute
Task 6: Neighbor Discovery And Routing with The Routing Information Protocol (RIP)
Coming soon...
Extensions (for the bored)
We're just getting started here, and there's a lot you can do to extend this (this is exactly how I felt when I put out the ray tracing assignment in graphics). Here are a few ideas:
- Add a thread that purges the ARP cache of a router every minute
- Implement features of a NAT, including modifying IP addresses at the network layer and ports at the transport layer
- Implement support for dynamic IP addresses by programming a DHCP server on your router, using the real DHCP protocol
- Use a trie data structure to match longest common prefixes
- Use a better distance vector routing protocol like babel